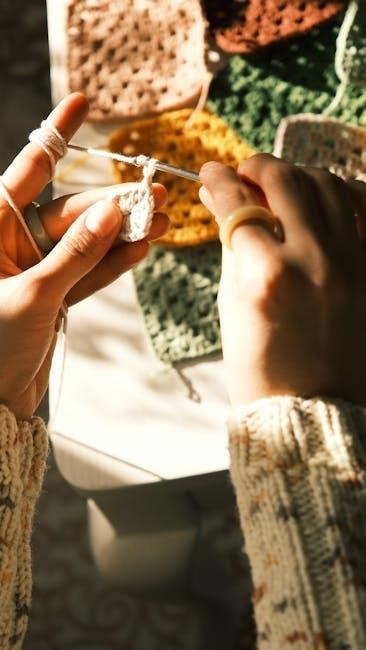
Finger loom weaving is a simple, versatile craft that uses a small, portable tool to create fabric. Ideal for beginners, it sparks creativity and portability, making it perfect for crafting on the go, as seen in guides like Essen’s approach to weaving squares with knitting yarn.
What is a Finger Loom?
A finger loom is a small, portable weaving tool used to create fabric without the need for large equipment. It consists of a frame with pegs or pins that hold the warp threads in place. The simplicity of its design makes it accessible to beginners, allowing for easy setup and weaving. Unlike traditional looms, finger looms are compact and lightweight, making them ideal for crafting on the go. They are often used to weave small projects like scarves, napkins, or decorative items. The loom’s portability and ease of use have made it a popular choice for fiber artists looking to explore weaving in a more approachable way.
A Brief History of Finger Looms
Finger looms have a rich history, originating in ancient cultures where weaving was a fundamental skill. Early looms were simple tools made from wood or bone, used to weave small fabrics for clothing and textiles. The concept evolved over centuries, with various cultures adapting the design for their specific needs. In the mid-20th century, finger looms gained popularity as a crafting tool, particularly among hobbyists and educators. Their portability and ease of use made them ideal for teaching weaving basics. Today, finger looms are enjoyed by crafters worldwide, blending traditional techniques with modern materials and creative designs. This timeless tool continues to inspire new generations of weavers, preserving a connection to our artisanal past while embracing contemporary creativity.
Why Use a Finger Loom?
A finger loom is an excellent choice for crafters due to its simplicity, portability, and versatility. It requires minimal setup and no complex tools, making it accessible to beginners. The loom’s compact size allows for easy storage and use in various settings, from home to travel. It’s cost-effective compared to larger looms, making it a great introduction to weaving. Additionally, finger looms enable the creation of small, intricate projects like scarves, bags, and home decor items. They also foster creativity, as they can be used with a wide range of yarns and techniques. This tool is perfect for those seeking a relaxing, artistic hobby that produces tangible results without overwhelming complexity.

Choosing the Right Yarn for Your Project
Selecting the right yarn ensures your finger loom project is durable, soft, and visually appealing. Consider yarn weight, fiber type, color, and texture to achieve desired results.
Understanding Yarn Types and Weights
Understanding yarn types and weights is essential for successful finger loom weaving. Yarns come in various fibers—wool, cotton, acrylic, and blends—each offering different textures and properties. Weight, measured by thickness, ranges from lace (very fine) to bulky (thick). Lighter weights, like fingering or sport, are ideal for delicate projects, while worsted or chunky yarns work well for sturdy, quick-to-finish items. Choosing the right yarn ensures proper drape, durability, and visual appeal. Always swatch to test how the yarn behaves. Familiarizing yourself with these basics helps you select the perfect yarn for your project, ensuring a satisfying and professional-looking result every time.
How to Select the Perfect Yarn for Beginners
Selecting the right yarn for finger loom weaving is crucial, especially for beginners. Start by considering the project’s purpose and the desired texture. Acrylic yarns are great for beginners due to their softness, durability, and affordability. Cotton yarns are ideal for summer projects, offering breathability and a natural feel. Wool blends provide warmth and are perfect for winter crafts. Choose a medium-weight yarn, as it is easier to handle and weaves evenly. Consider color and how it will enhance your design. Always check the yarn label for care instructions to ensure it suits your needs. For a first project, opt for a smooth, non-fuzzy yarn in a solid color to make the weaving process less complicated. Budget-friendly options like worsted weight yarns are excellent for practicing and mastering basic techniques.

Preparing Your Yarn
Preparing your yarn involves measuring and cutting it efficiently, then winding it into manageable balls or skeins. This ensures you have the right amount and prevents tangles, making the weaving process smoother and more enjoyable.
Measuring and Cutting Yarn Efficiently
Measuring and cutting yarn efficiently is crucial for finger loom weaving. Start by determining how much yarn you need based on your project size and pattern. Use a measuring tool or the loom itself to estimate lengths. Always cut more than you think you need to avoid running out mid-project. To ensure accuracy, measure the yarn in consistent lengths, such as wrapping it around a fixed object or using a yarn gauge. Cut cleanly with sharp scissors or a yarn cutter to prevent fraying. For large projects, consider pre-cutting yarn into manageable sections to streamline the weaving process. This step saves time and reduces waste, ensuring a smooth workflow.

Winding Yarn into Manageable Balls or Skeins
Winding yarn into manageable balls or skeins is essential for finger loom weaving. Start by securing one end of the yarn to a winder or your hand. Wind the yarn in a consistent, tight spiral to prevent tangling. For larger skeins, use a yarn winder or a sturdy object like a book. For smaller amounts, wind directly onto your fingers or a small tool. Once complete, secure the end with a small twist or clip. This method keeps the yarn organized, prevents knots, and ensures easy access during weaving. Properly wound yarn also maintains tension, making the weaving process smoother and more efficient.

Setting Up Your Finger Loom
Setting up your finger loom involves assembling the frame, attaching the warp pegs, and ensuring the device is stable. Use a screwdriver or pliers to secure parts tightly. Place the loom on a flat surface and test its stability before weaving. A well-prepared loom guarantees even tension and smooth workflow. Always ensure all screws are tightened to avoid movement during use. Keep tools nearby for quick adjustments. A stable setup is key to successful finger loom weaving. Start with a clean, organized workspace for the best results. Happy weaving!
How to Build a Simple Finger Loom at Home
Building a simple finger loom at home requires basic materials like wood, screws, and a measuring tape. Start by cutting two wooden pieces for the frame and attach them perpendicularly to form a rectangular shape. Drill small holes along the longer sides for the warp pegs. Secure the pegs tightly using screws. For a more durable option, you can use a small wooden board or even 3D print a custom design. Sand the edges for smooth handling. Alternatively, use a sturdy cardboard template as a cost-effective alternative. Once assembled, test the tension by stretching yarn across the pegs. This DIY project is perfect for beginners, offering a fun and creative way to start weaving. With basic tools, you can craft a functional finger loom in no time!
Understanding the Basic Parts of a Finger Loom
A finger loom consists of a few essential parts designed to simplify the weaving process. The main frame holds the structure, typically made of wood, plastic, or metal. Warp pegs are small pins or notches where the warp yarn is secured. The weft guide helps in passing the weft yarn through the warp threads evenly. Some looms include tension adjustment features to keep the yarn taut. The simplicity of these components allows for easy portability and versatility. Understanding each part helps in setting up and using the loom effectively. This straightforward design makes finger loom weaving accessible to everyone, regardless of skill level or experience.

The Weaving Process
Finger loom weaving involves preparing the loom, setting the warp, and weaving the weft. This step-by-step process allows for creative pattern-making and is highly portable, making it simple to create unique textiles anywhere.
Step-by-Step Guide to Setting Up the Warp
To set up the warp on a finger loom, begin by measuring and cutting the warp threads according to your project’s requirements. Attach one end of each thread to the loom’s starting peg. Next, stretch the warp threads tightly across the loom, securing the other ends to the opposite pegs. Ensure the threads are evenly spaced and taut to maintain consistent tension. Finally, tie off the warp ends to prevent them from unraveling. Properly setting the warp is essential for a stable and even weave, making it the foundation of your finger looming project.
How to Weave the Weft: A Beginner’s Guide
Weaving the weft is the heart of finger looming. Start by holding the weft yarn in one hand and gently inserting it over and under the warp threads. Use a tapestry needle or your fingers to guide the yarn evenly across the loom. Ensure the yarn lies flat and untwisted, maintaining consistent tension to avoid loose or tight weaving. For each pass, bring the yarn back in the opposite direction, creating a back-and-forth motion. Use a fork or pick tool to help tighten the yarn if needed. Keep the weft aligned and evenly spaced for a professional finish. Patience and consistency will yield beautiful results.
Creating Patterns and Designs on Your Loom
Designing patterns on a finger loom is an exciting way to personalize your projects. Start by experimenting with color changes in the weft yarn to create stripes or gradients. For more intricate designs, try alternating yarn textures or incorporating beads. Simple patterns like checkerboard or herringbone can add visual interest. Use a fork or pick tool to help tighten the yarn and maintain pattern clarity. For advanced designs, consider using multiple colors in a single row or creating geometric shapes by manipulating the warp and weft alignment. The key to successful patterns is consistency and careful planning. With practice, you can achieve stunning, professional-looking designs that elevate your weaving projects to the next level.

Finishing Your Weaving Project
Trim excess yarn, tie secure knots, and tuck ends neatly to complete your project. Add a decorative border if desired for a polished finish.
How to Secure Your Weaving Once Completed
To secure your weaving, carefully tie off all loose yarn ends using a sturdy knot. Use a needle to weave in any remaining threads, ensuring they are tightly tucked into the fabric. Trim excess yarn close to the surface to maintain a clean finish. For added stability, consider sewing a whipstitch or hem along the edges to prevent fraying. If desired, add a decorative border or backing to enhance durability. Allow the weaving to relax before use, as tension may loosen over time. Properly securing your work ensures it remains intact and professional-looking for years to come.
Removing the Weaving from the Loom Safely
To remove your weaving from the finger loom without damage, gently loosen the tension on the warp threads. Carefully lift the woven fabric from the loom, taking note of any warp ends that may still be secured; Use scissors or a needle to cut or untie any remaining threads holding the fabric in place. Handle fragile or tightly woven sections with extra care to avoid tearing. Once free, inspect the edges for any loose ends that may need securing. Store your finished piece flat or rolled to maintain its shape until ready for use or display.

Tips for Common Mistakes and Troubleshooting
Identify common errors like uneven tension or misaligned warp threads. Regularly inspect your work to catch mistakes early. Adjust yarn placement and tighten or loosen threads as needed for consistency.
Fixing Common Errors in Finger Loom Weaving
Common errors in finger loom weaving include uneven tension, misaligned weft, or loose ends. To fix uneven tension, gently tug on the warp threads to balance the weave. For misaligned weft, adjust the yarn placement by loosening or tightening the relevant threads. If loose ends appear, tuck them into the weave using a yarn needle. Yarn breaks can be repaired by tying a secure knot and trimming the excess. Over-tightening can cause warping, so ensure even pressure. Count rows regularly to maintain consistency. If a mistake is too noticeable, consider removing the last few rows and re-weaving. Use a comb to align threads neatly. Starting over may be necessary for severe errors, but practice improves results.
Troubleshooting Tips for Beginners
Beginners often face challenges like uneven edges, tangled yarn, or difficulty maintaining consistent tension. To avoid uneven edges, ensure the warp is evenly spaced and tighten it gradually. Tangles can be prevented by winding yarn into smaller balls or using a yarn bowl. If tension becomes too tight, gently loosen the warp threads. For consistent weaving, practice a steady back-and-forth motion with the weft. If yarn ends slip out, secure them by weaving them into the fabric. Keep a pair of scissors handy to trim excess yarn. Regularly inspect your work to catch mistakes early. Patience and practice are key to mastering finger loom weaving. Start small and gradually build complexity as skills improve.
Creative Projects You Can Make
Finger loom weaving opens the door to crafting unique textiles like scarves, headbands, and wall hangings. Explore customization with colors, patterns, and yarn types for personalized creations.
Simple Projects to Get You Started
Begin your finger loom journey with simple yet rewarding projects like woven scarves, headbands, or coasters. These projects require minimal materials and time, making them perfect for beginners. Start with a basic scarf using a single color to practice your weaving technique. Headbands are another great option, allowing you to experiment with stretchy yarns. For smaller items, try weaving coasters or ornaments to refine your skills. These projects are ideal for mastering the fundamentals of warp and weft without feeling overwhelmed. Once comfortable, you can gradually incorporate patterns or beads for added flair. These simple creations will build your confidence and prepare you for more complex designs.
Advanced Projects to Challenge Your Skills
Once you’ve mastered the basics, take your finger loom weaving to the next level with advanced projects like intricate wall hangings, multi-color blankets, or textured home decor items. Challenge yourself by experimenting with complex patterns, such as herringbone or chevron designs, using multiple yarn colors. You can also incorporate beads or sequins for added visual interest. Try weaving a intricate scarf with varying textures or create a sturdy bag with reinforced straps. These projects require precision, patience, and creativity, helping you refine your skills and explore the full potential of finger loom weaving. They are perfect for showcasing your craftsmanship and pushing your artistic boundaries.